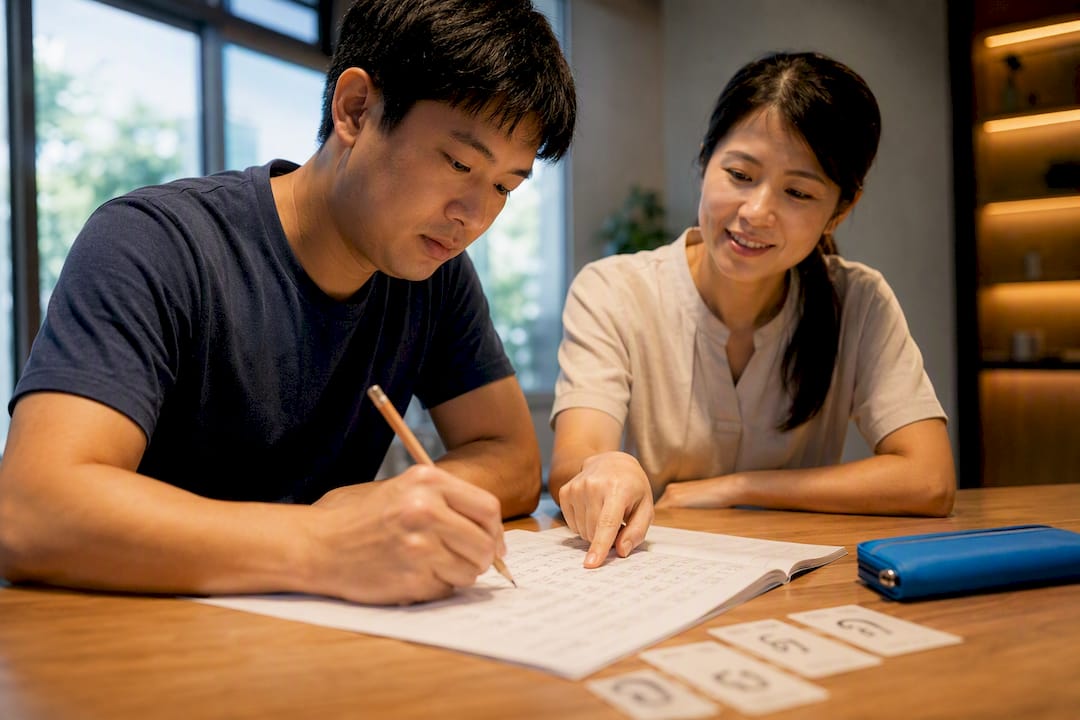
Start by mastering stroke order, since Thai characters always begin at the “head,” that small circle anchoring nearly every letter. From there, spend 10 to 15 minutes daily alternating between tracing and recall using either an interactive canvas or printable practice sheets. The script has dozens of consonants, numerous vowel forms, and several tone marks to work through. The sections below cover stroke fundamentals, digital tools, printable sheets, a full practice plan, and where to get help when you plateau.
TL;DR:
- Mastering the head circle, drawn counter-clockwise and starting each character, is essential to maintain correct proportion and fluidity in Thai handwriting.
- Digital tools that combine tracing, recall practice, and error tracking accelerate recognition, but should be complemented with paper exercises for muscle memory development.
- Printable worksheets using guided tracing and blank recall rows, with character grouping by tone or shape, improve learning efficiency and visual consistency.
- A structured four-week routine focusing on recognition, recall, vowels, and fluency can lead to noticeable legibility gains within three to four weeks.
- Personal instruction helps correct reversed strokes and look-alike confusions more quickly than self-study alone, especially after several weeks of practice.
Table of Contents
- What Are the Fundamentals of Thai Stroke Order?
- Which Interactive Tools Actually Improve Handwriting?
- What Printable Worksheets Work Best for Practice?
- How Do You Build a 4-Week Thai Handwriting Routine?
- Why Guided Instruction Speeds Up Handwriting Progress
- An Editor’s Take on Teaching Thai Handwriting to Adults
- Ready for Instructor Feedback on Your Handwriting?
- Where to Find More Thai Handwriting Resources
- Sources
- FAQ
What Are the Fundamentals of Thai Stroke Order?
Thai script packs a lot into a small character set: 44 consonants, roughly 32 vowel forms, 4 tone marks, and 10 numerals, according to a detailed breakdown of Thai letters. Unlike Latin script, Thai vowels don’t sit neatly in a row after their consonant. They can land before, after, above, or below it, which changes how you plan spacing on the page before you even pick up a pen.
The rule that matters more than any other is this: start at the head. Most Thai characters begin with a small circle, and you draw that circle first, then let the rest of the letter flow out of it in one continuous motion, often curving counter-clockwise, as explained in this guide to writing like a local. Skip the circle, or draw it in the wrong direction, and the whole letter tips out of proportion.
Three mistakes show up constantly among self-taught learners:
- Mixing print-style letter shapes with cursive flow, which creates characters that belong to neither system
- Drawing the head circle clockwise instead of counter-clockwise, or skipping it and starting mid-stroke
- Lifting the pen too many times per character, which breaks the fluid motion Thai script depends on
Fixing this is mostly about slowing down and rebuilding the motion from the head outward, one letter at a time.
Pro Tip: Practice on grid paper with a fixed baseline and midline. It forces consistent letter height and makes head-circle placement obvious the moment it drifts.
If you’re left-handed, angle the paper slightly clockwise and keep your wrist loose. The counter-clockwise head motion feels more natural for right-handed writers, so left-handed learners often need a few extra sessions to build the same fluidity.
Which Interactive Tools Actually Improve Handwriting?
A good digital practice tool does three things: lets you trace over a guide, tests you from memory, and tracks which characters you keep getting wrong. Sites like GorGai’s free Thai alphabet practice combine trace mode with a recall test, which matters because tracing alone builds passive recognition, not active recall.
A simple session structure works better than open-ended practice:
- 2 to 3 minutes of tracing to refresh the correct stroke path
- 5 to 8 minutes of recall drills, writing from memory with the guide hidden
- 2 to 4 minutes reviewing what you got wrong and repeating those characters
A stylus gives you the most accurate feedback on stroke direction and pressure, but a finger or mouse still works fine for recall drills where shape matters more than pen pressure. Save your progress after each session if the tool allows it. Most trace-and-test platforms track error patterns, and seeing the same three letters flagged repeatedly tells you exactly where to focus tomorrow.
Digital practice builds recognition speed fast, but it doesn’t fully replace paper. Alternate digital sessions with printed sheets a few times a week. The muscle memory from actually pressing a pen into paper consolidates differently than a stylus swipe on glass.
What Printable Worksheets Work Best for Practice?
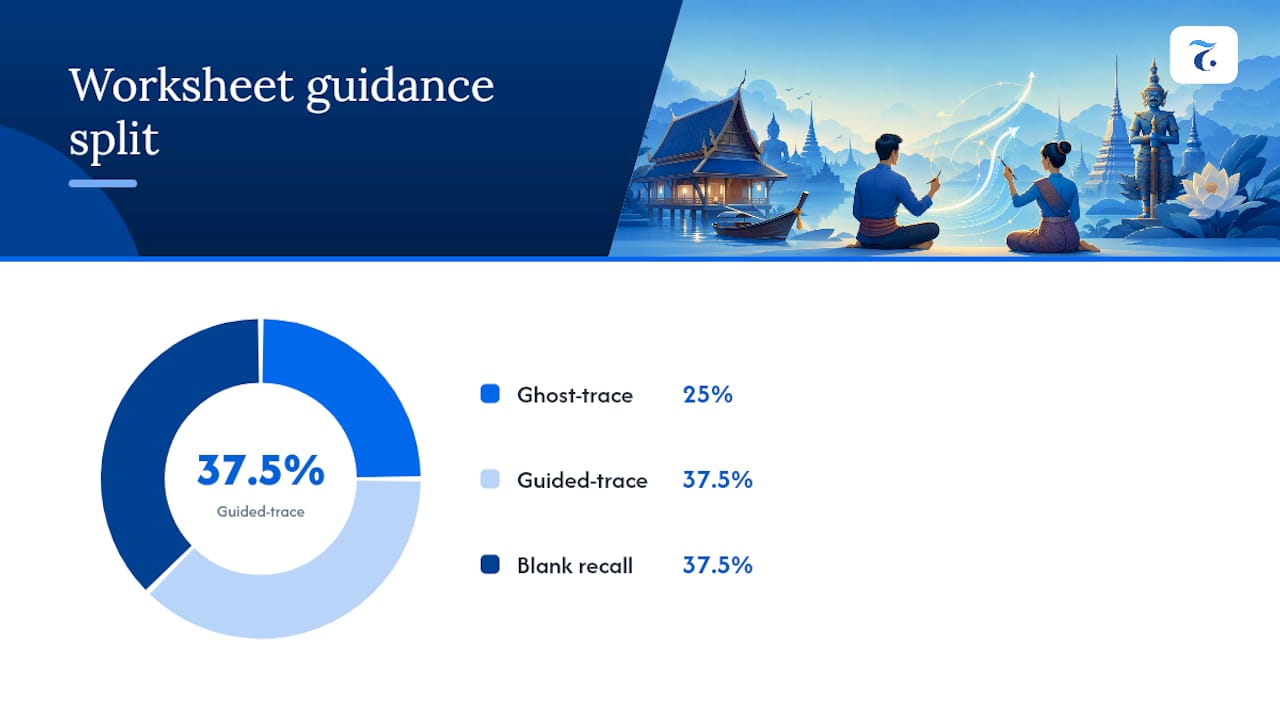
The best worksheets follow a progression, not a repetition. Start each row with one or two ghost-trace copies (a faint outline you trace directly), move into guided-trace rows with stroke-order numbers, then finish with blank rows where you write from memory alone. This structure enforces retrieval, not just copying, which is the same logic behind the Thai handwriting generator on GitHub.
Grid choice matters more than people expect. A dedicated Thai grid or a cross-grid layout helps because vowel placement above, below, before, or after a consonant needs consistent reference lines to look right on the page. Group characters by tone class or by visual look-alikes rather than alphabetical order. It makes the confusing pairs obvious faster.
A short setup checklist before you print:
- Pick a font style. Traditional, Modern, or Cursive, since generators typically offer all three
- Choose a grid type suited to vowel placement, not a plain lined page
- Set 2 ghost rows, 3 guided rows, and 3 blank recall rows per character
- Print on A4 with enough margin for notes
- Group 8 to 10 characters per sheet by tone class or shape similarity
Our step-by-step guide for beginners has more character groupings you can slot straight into a generator.
How Do You Build a 4-Week Thai Handwriting Routine?
A structured four-week block beats scattered practice, mostly because each week targets a specific weak point instead of reviewing everything at once.
- Week 1, recognition and tracing. Learn to identify each consonant and trace it correctly, focusing entirely on head placement and stroke direction.
- Week 2, recall and look-alikes. Drop the guide and write from memory, pairing up characters that resemble each other to sharpen the distinction.
- Week 3, vowels and tone marks. Add vowel placement rules and the four tone marks, since these sit above or below consonants and shift your spacing habits.
- Week 4, small words and timed fluency. Combine consonants and vowels into short words, then time yourself writing a set list to build speed without sacrificing form.
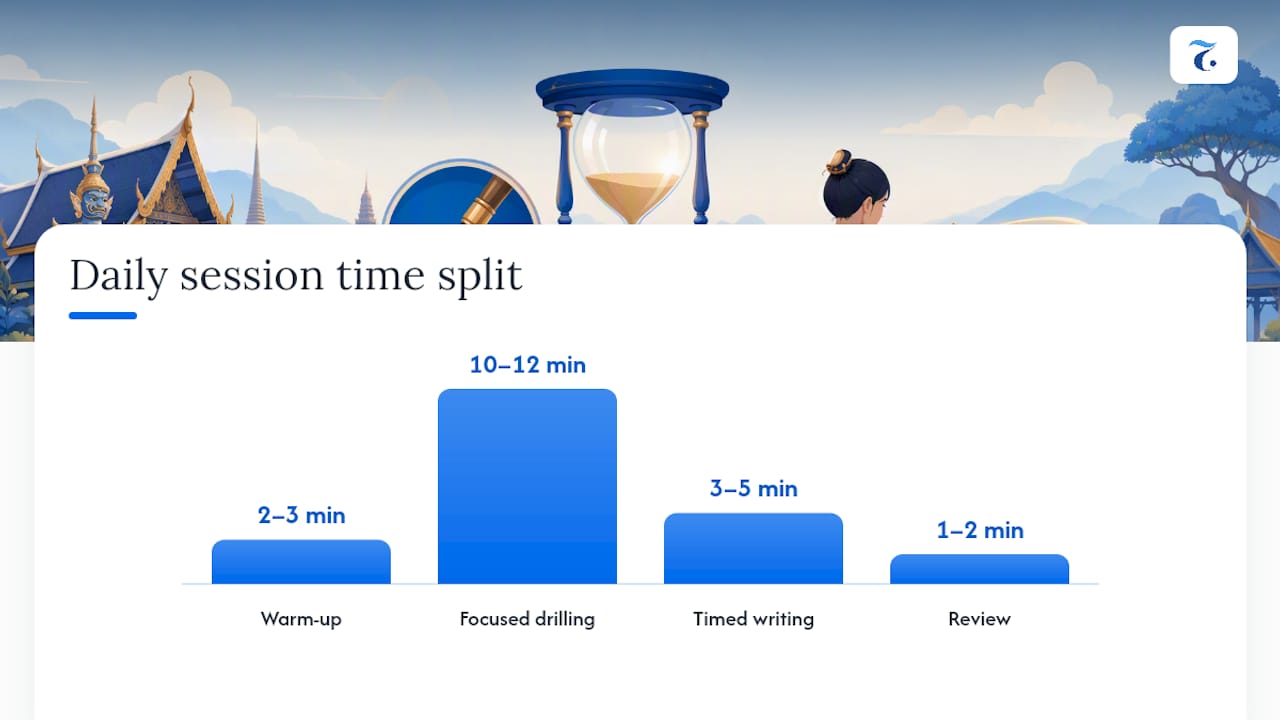
Each daily session runs about 15 to 20 minutes: a 2 to 3 minute warm-up tracing familiar letters, 10 to 12 minutes of focused drilling on new or troublesome characters, 3 to 5 minutes of timed writing, and a quick 1 to 2 minute review of mistakes.
For drills, try five repeats of one letter across five separate sessions rather than 25 repeats in one sitting. This spaced repetition sticks better than cramming, a pattern consistent with how trace-to-recall progression is built into practice tools. Pair drills work well for look-alikes, writing both letters side by side ten times each. Dictation, where someone reads a word aloud and you write it, is one of the fastest ways to test whether your handwriting actually holds up under real use, not just controlled tracing.
Pro Tip: Track legibility, not speed. Photograph one practice page each week and check whether a native reader could recognize every letter without hesitation. That’s a better progress marker than how fast you write.
Resist the urge to speed up before your stroke order is automatic. Writing fast with the wrong stroke path just cements bad habits faster.
Why Guided Instruction Speeds Up Handwriting Progress
Self-study gets you far, but an instructor catches errors you can’t see in your own writing, particularly with look-alike letters that feel correct until someone points out the head circle is backward. A Thai language school offers instructor-led adult courses with a curriculum aligned to CU-TFL standards, taught by bilingual native Thai teachers across group, private, and online formats.
A few reasons guided feedback closes gaps faster than self-correction alone:
- An instructor spots reversed stroke direction immediately, something that’s nearly impossible to catch by comparing your own handwriting to a printed guide
- Look-alike confusion (letters that differ by one small mark) gets resolved in minutes with direct correction, rather than weeks of trial and error
- Structured lessons pace vowel and tone mark introduction so you’re not tackling everything at once
If you’ve run a few weeks of daily drills and progress has stalled, that’s usually the signal to book a short private session focused specifically on handwriting.
An Editor’s Take on Teaching Thai Handwriting to Adults
Consistent 15-minute daily practice typically shows visible improvement within three to four weeks, not months. The biggest hurdle isn’t motivation. It’s hand tension from years of Latin-script habits fighting the fluid, circular motion Thai demands. A good instructor fixes this in one or two corrections. Pair handwriting drills with listening practice early. Recognizing sounds speeds up recall of the shapes tied to them.
— Paul
Ready for Instructor Feedback on Your Handwriting?
Self-study handwriting drills only go so far before you need someone watching your pen move, not just your finished letters. The school offers direct correction through instructor-led courses built around CU-TFL aligned curriculum, taught by bilingual native Thai teachers who can spot a reversed head circle in seconds.

If you want a low-commitment starting point, the Thai Trial Lesson runs 45 SGD with a 50 SGD one-time registration fee, and gives an instructor a chance to watch your actual stroke technique. For ongoing structured practice, the Conversational Thai Beginner courses run 350 SGD each and build handwriting alongside speaking and listening. If you’d rather have every session tailored to your specific handwriting gaps, a Private Thai Course lets an instructor build drills around your look-alike confusions and pacing needs directly. Classes run in person at 10 Anson Road, #22-07, International Plaza, Singapore 079903, right above Tanjong Pagar MRT, or online over Zoom. Book a trial lesson to get your stroke order checked by a native instructor this week.
Where to Find More Thai Handwriting Resources
A few tools cover most of what a self-directed learner needs beyond this guide.
- GorGai’s interactive Thai alphabet practice for trace-and-test drills with progress tracking built in.
- The thai_script_pro worksheet generator for custom printable sheets with ghost-trace and recall rows.
- The r12a Thai script reference for a deeper technical look at vowel placement and glyph shaping.
- A Thai language school’s list of Thai writing exercises for structured drill templates.
- A guide to common Thai mistakes for troubleshooting recurring errors.
Sources
- Writing Thai letters: a complete guide to mastering Thai script — VerbaCard
- GorGai — Learn Thai alphabet free (interactive practice)
- Thai — Script data and writing system (r12a)
FAQ
How long does it take to learn Thai handwriting?
Most adult learners see legible, recognizable handwriting within three to four weeks of consistent 15-minute daily practice. Full fluency and speed take longer, usually a few months of regular drilling combined with vowel and tone mark practice.
Do I need a stylus for digital Thai handwriting practice?
A stylus gives the most accurate feedback on stroke direction, but a finger or mouse works fine for recall and recognition drills. Save the stylus practice for sessions where stroke order accuracy matters most.
What’s the biggest mistake beginners make in Thai handwriting?
Starting characters somewhere other than the head circle is the most common error, since it throws off the entire letter’s proportion. Correct head-first stroke order also cuts down on look-alike letter confusion significantly.
Should I practice printed or cursive Thai script first?
Start with one style consistently rather than mixing both, since blending print and cursive habits creates characters that belong to neither. Most instructors recommend a standard traditional style first, then introducing cursive once stroke order is automatic.
When should I move from self-study to a class?
If you’ve drilled daily for three or more weeks and specific letters still feel wrong despite repetition, that’s the sign to get instructor feedback. A Thai Trial Lesson at 45 SGD is a low-cost way to get a native teacher to check your technique directly.